Turn an Old Laptop Into a Secure, Always-On Linux Home Server With AI Tools (No, You Don't Need a Mac Mini)
A full guide to repurposing an old laptop as a hardened Linux server with Tailscale VPN, Cloudflare DDNS, Cockpit dashboard, Claude Code, and OpenClaw — accessible from anywhere in the world.

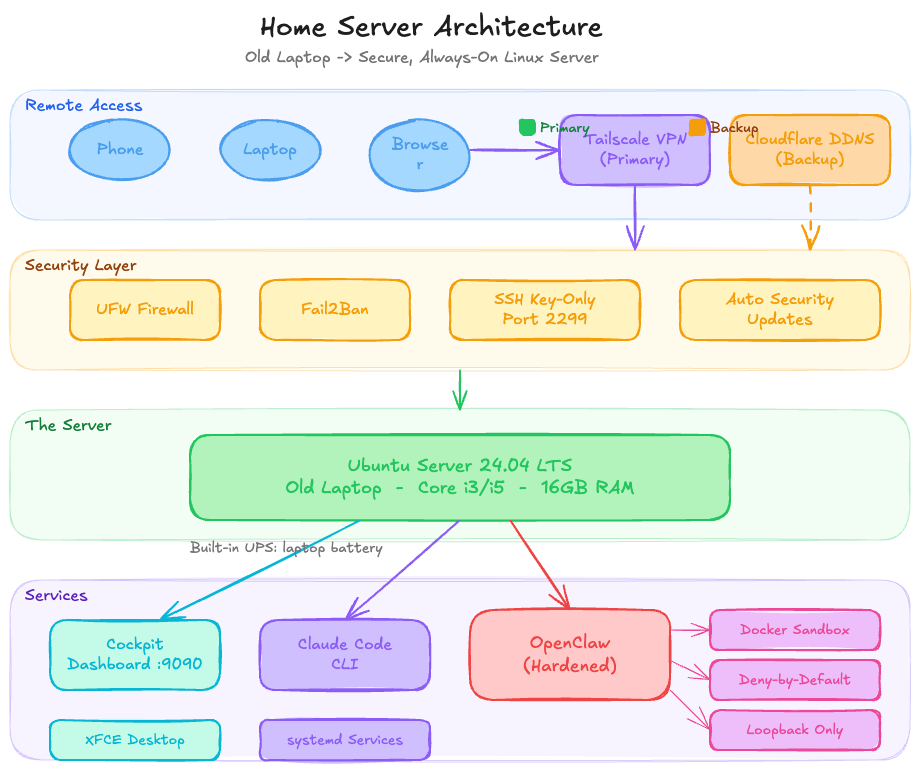
Everyone’s losing their minds over the Mac Mini right now. “It’s the perfect home server!” Sure, if you enjoy spending $600 on a machine that does the exact same job as that old laptop sitting in a drawer under some cables and a charging brick you haven’t identified in three years. A Core i3 or i5 with 16GB of RAM is not a “weak” machine — it’s a perfectly capable Linux server, and the only thing it was missing was a purpose.
This guide is that purpose.
By the end of this, you’ll have a secure, always-on Linux home server you can SSH into from anywhere in the world, manage via a browser dashboard, and run AI development tools on — all from your phone or laptop, whether you’re home or across the planet. No Mac Mini required. No monthly cloud bill. No excuses.
Hardware used: Any old laptop — Core i3/i5, 16GB RAM. The one I used was literally collecting dust.
The Stack
- OS: Ubuntu Server 24.04 LTS + XFCE desktop (light GUI for occasional local use)
- Remote access: Tailscale VPN mesh (primary) + hardened SSH with Cloudflare DDNS (backup/direct)
- Dynamic DNS: Cloudflare API with your own domain —
home.yourdomain.com - Web dashboard: Cockpit — a gorgeous browser-based system UI
- AI tools: Claude Code CLI + OpenClaw (hardened)
- Security: UFW firewall + Fail2Ban + key-based SSH only + OpenClaw gateway lockdown
Step 1: Install Ubuntu Server 24.04 LTS
Download the Ubuntu Server 24.04 LTS ISO, flash it to a USB with Balena Etcher, and boot from it.
During the install wizard, make sure to check Install OpenSSH server — this lets you SSH in the moment the machine reboots, no monitor needed.
Step 2: Initial Setup
sudo apt update && sudo apt upgrade -y
sudo apt install -y curl wget git ufw fail2ban htop net-tools unzip \
  software-properties-common jq
Get your server’s local IP — you’ll need it shortly:
hostname -IStep 3: Tailscale — Your Primary Access Method
This is the most important part of the whole setup. Tailscale creates a private encrypted mesh network between all your devices. Your server gets a stable private IP like 100.x.x.x that works from anywhere — home network, coffee shop, phone data, doesn’t matter. No port forwarding needed, no dynamic DNS needed for this path, it just works.
curl -fsSL https://tailscale.com/install.sh | sh
sudo tailscale up
sudo systemctl enable tailscaled
Follow the auth link printed in your terminal to connect the machine to your Tailscale account. Then:
tailscale ip -4
# Something like 100.94.x.x — this is your permanent server address
Install the Tailscale app on your laptop and phone. From that point on, you reach your server at its Tailscale IP from anywhere on the planet. No configuration, no drama.
This is how you’ll access everything — SSH, Cockpit, OpenClaw — all through Tailscale.
Step 4: Harden SSH
Even with Tailscale as your primary access, you want SSH locked down properly. And you’ll want a direct SSH fallback for the rare case Tailscale has an issue.
On your laptop, generate a key if you don’t have one:
ssh-keygen -t ed25519 -C "your-email@example.com"Copy it to the server:
ssh-copy-id -p 22 youruser@192.168.1.xNow on the server, harden SSH:
sudo cp /etc/ssh/sshd_config /etc/ssh/sshd_config.backup
sudo nano /etc/ssh/sshd_config
Set these values:
Port 2299
PermitRootLogin no
MaxAuthTries 3
PubkeyAuthentication yes
PasswordAuthentication no
PermitEmptyPasswords no
AllowUsers youruser
ClientAliveInterval 300
ClientAliveCountMax 2
sudo systemctl restart sshdTest in a new terminal before closing your current session:
ssh -p 2299 youruser@192.168.1.xFrom now on, primary access goes via Tailscale:
ssh -p 2299 youruser@100.x.x.xStep 5: Configure the Firewall
sudo ufw default deny incoming
sudo ufw default allow outgoing

# SSH — open for the direct fallback path
sudo ufw allow 2299/tcp comment 'SSH'

# Cockpit — only accessible via Tailscale, invisible to the public internet
sudo ufw allow in on tailscale0 to any port 9090

sudo ufw enable
sudo ufw status verbose
The Tailscale interface rule for Cockpit means the dashboard is completely hidden from the public internet. It only responds when you’re on your Tailscale network.
Step 6: Fail2Ban
sudo nano /etc/fail2ban/jail.local[DEFAULT]
bantime = 1h
findtime = 10m
maxretry = 4
[sshd]
enabled = true
port = 2299
maxretry = 3
bantime = 24hsudo systemctl enable fail2ban
sudo systemctl restart fail2ban
sudo fail2ban-client status sshdStep 7: Cloudflare DDNS — Direct SSH Fallback via Your Own Domain
Tailscale handles 99% of remote access. But it’s good practice to have a second independent path — for locked-down networks, misconfiguration recovery, or letting someone else in without Tailscale.
Using Cloudflare’s API, we auto-update a subdomain on your own domain to always point to your home’s current public IP.
In Cloudflare:
- Go to your domain → DNS → add an A record:
home.yourdomain.com→ any IP (we’ll auto-update it) - Set the proxy to DNS only (grey cloud, not orange) — Cloudflare can’t proxy raw TCP/SSH traffic
- Create an API token: My Profile → API Tokens → Edit zone DNS, scoped to your specific domain only
On the server:
sudo nano /opt/cloudflare-ddns.sh#!/bin/bash
ZONE_ID="your_zone_id" # Cloudflare → your domain → Overview → right sidebar
RECORD_NAME="home.yourdomain.com"
API_TOKEN="your_api_token"
CURRENT_IP=$(curl -s https://api.ipify.org)
RECORD_ID=$(curl -s -X GET \
"https://api.cloudflare.com/client/v4/zones/$ZONE_ID/dns_records?type=A&name=$RECORD_NAME" \
-H "Authorization: Bearer $API_TOKEN" \
-H "Content-Type: application/json" | jq -r '.result[0].id')
curl -s -X PUT \
"https://api.cloudflare.com/client/v4/zones/$ZONE_ID/dns_records/$RECORD_ID" \
-H "Authorization: Bearer $API_TOKEN" \
-H "Content-Type: application/json" \
--data "{\"type\":\"A\",\"name\":\"$RECORD_NAME\",\"content\":\"$CURRENT_IP\",\"ttl\":60,\"proxied\":false}" \
| jq '.success'sudo chmod +x /opt/cloudflare-ddns.sh
sudo /opt/cloudflare-ddns.sh # Should print: true
crontab -e
# Add this line:
*/5 * * * * /opt/cloudflare-ddns.sh >/dev/null 2>&1Router port forwarding: In your router admin panel (usually 192.168.1.1), forward external port 2299 → internal IP of the server, port 2299, TCP. Also set a static DHCP reservation for the server’s MAC address so the internal IP never changes.
Direct SSH fallback:
ssh -p 2299 youruser@home.yourdomain.comStep 8: Keep the Machine Always On
sudo systemctl mask sleep.target suspend.target hibernate.target hybrid-sleep.target

sudo nano /etc/systemd/logind.conf
HandleLidSwitch=ignore
HandleLidSwitchExternalPower=ignore
IdleAction=ignoresudo systemctl restart systemd-logindStep 9: XFCE Desktop
A lightweight GUI that works nicely with touchscreen displays for occasional local use:
sudo apt install -y xfce4 xfce4-goodies lightdm
sudo apt install -y xserver-xorg-input-evdev xinput
sudo systemctl enable lightdm
sudo systemctl set-default graphical.target
Step 10: Cockpit — Browser-Based System Dashboard
Cockpit is a clean, zero-config web UI for monitoring CPU, RAM, disk, services, and logs. Two commands to install:
sudo apt install -y cockpit
sudo systemctl enable --now cockpit.socket
Access at https://your-tailscale-ip:9090 from any browser. Since we restricted it to the Tailscale interface in UFW, it’s completely invisible to the public internet and only accessible when you’re connected to your Tailscale network.
Step 11: Claude Code CLI
# Install nvm
curl -o- https://raw.githubusercontent.com/nvm-sh/nvm/v0.40.3/install.sh | bash
. "$HOME/.nvm/nvm.sh"

# Install Node.js 24 LTS
nvm install 24

# Install Claude Code — native installer is recommended over npm
curl -fsSL https://claude.ai/install.sh | bash
source ~/.bashrc

claude --version
Step 12: OpenClaw — Install and Harden
Get it running
One gotcha with OpenClaw over SSH: systemctl --user requires a proper user session to be active, which doesn’t exist by default when connecting via SSH. The fix is one command:
sudo loginctl enable-linger $USER

echo 'export XDG_RUNTIME_DIR="/run/user/$(id -u)"' >> ~/.bashrc
echo 'export DBUS_SESSION_BUS_ADDRESS="unix:path=${XDG_RUNTIME_DIR}/bus"' >> ~/.bashrc
source ~/.bashrc

openclaw gateway start
Without enable-linger, you’ll hit systemctl --user unavailable: Failed to connect to bus: No medium found — a cryptic error that is, anticlimactically, a one-liner fix.
Verify your version
Before doing anything else, confirm you’re on a non-vulnerable version:
openclaw --version
# Must be 2026.1.29 or later (CVE-2026-25253)
If not: npm install -g openclaw@latest
Lock down the gateway
By default OpenClaw’s gateway binds more broadly than it needs to. Restrict it to loopback only, enable token auth, and disable mDNS discovery:
openclaw config set gateway.mode "local"
openclaw config set gateway.bind "loopback"
openclaw config set gateway.port 18789
openclaw config set gateway.auth.mode "token"
openclaw config set gateway.auth.token "$(openssl rand -hex 32)"
openclaw config set discovery.mdns.mode "off"
Save the generated token in your password manager — you’ll need it to connect the Control UI.
# Verify it took effect
openclaw config get gateway.bind
# Should say: loopback
Sandbox isolation
Run agents in Docker isolation so they can’t touch your host filesystem:
openclaw config set agents.defaults.sandbox.mode "all"
openclaw config set agents.defaults.sandbox.scope "session"
openclaw config set agents.defaults.sandbox.workspaceAccess "none"

# Build the sandbox image
bash scripts/sandbox-setup.sh

# Verify
openclaw sandbox explain
# Confirm: mode=all, workspaceAccess=none
Tool policy — deny by default
Don’t let agents run arbitrary tools on the host. Deny dangerous tool groups at the host level, allow only what’s needed inside the sandbox:
# Host: deny write/runtime tools
openclaw config set --json 'tools.deny' '["group:runtime", "write", "edit", "apply_patch"]'

# Sandbox: minimal allow list
openclaw config set --json 'tools.sandbox.tools.allow' '["group:messaging", "group:sessions", "group:memory", "read"]'

# Sandbox: belt-and-suspenders deny
openclaw config set --json 'tools.sandbox.tools.deny' '["group:runtime", "write", "edit", "apply_patch", "browser", "canvas", "cron", "gateway", "nodes"]'

# Disable elevated tools
openclaw config set tools.elevated.enabled false
Lock down the config directory
chmod 700 ~/.openclaw
chmod 600 ~/.openclaw/openclaw.json
touch ~/.openclaw/.env
chmod 600 ~/.openclaw/.env
Run the security audit
openclaw security audit
openclaw security audit --deep
openclaw security audit --fix
Fix anything it flags before moving on.
Run as a systemd service
So OpenClaw starts automatically on boot and restarts if it crashes:
sudo tee /etc/systemd/system/openclaw.service << 'EOF'
[Unit]
Description=OpenClaw Gateway
After=network-online.target docker.service
Wants=network-online.target
Requires=docker.service

[Service]
Type=simple
User=youruser
Group=youruser
WorkingDirectory=/home/youruser
ExecStart=/home/youruser/.nvm/versions/node/v24.13.1/bin/openclaw gateway start
Restart=always
RestartSec=10
StandardOutput=journal
StandardError=journal
NoNewPrivileges=true
PrivateTmp=true
EnvironmentFile=/home/youruser/.openclaw/.env

[Install]
WantedBy=multi-user.target
EOF

# Find the real openclaw binary path first:
which openclaw

sudo systemctl daemon-reload
sudo systemctl enable --now openclaw
sudo systemctl status openclaw
Weekly maintenance
Set a calendar reminder for this — five minutes once a week:
openclaw security audit --deep
openclaw sandbox explain
openclaw logs --follow    # scan for anything odd, Ctrl+C when done
Step 13: Auto Security Updates
sudo apt install -y unattended-upgrades
sudo dpkg-reconfigure --priority=low unattended-upgrades
Quick Reference
| What | Command |
|---|---|
| SSH via Tailscale (primary) | ssh -p 2299 youruser@100.x.x.x |
| SSH via domain (backup) | ssh -p 2299 youruser@home.yourdomain.com |
| SSH on local network | ssh -p 2299 youruser@192.168.1.x |
| Cockpit dashboard | https://100.x.x.x:9090 (via Tailscale) |
| Tailscale status | tailscale status |
| Check banned IPs | sudo fail2ban-client status sshd |
| Firewall status | sudo ufw status |
| OpenClaw status | sudo systemctl status openclaw |
| OpenClaw security audit | openclaw security audit --deep |
| Rotate OpenClaw token | openclaw config set gateway.auth.token "$(openssl rand -hex 32)" |
Final Thoughts
The whole stack runs comfortably on an old laptop — I’ve had zero performance issues running Tailscale, SSH, Cockpit, Claude Code, and OpenClaw simultaneously on modest hardware. The laptop battery also acts as a built-in UPS, which is a quiet bonus nobody talks about when they’re busy benchmarking their Mac Mini.
The access story is clean: Tailscale is your primary method for everything — encrypted, zero-config, works from any network without touching your router. And OpenClaw running hardened with gateway loopback binding, Docker sandbox isolation, and deny-by-default tool policies means your AI agent layer isn’t a liability either.
Most home server guides stop at “it works.” This one stops at “it works and it’s locked down.” There’s a difference.
Now go rescue that laptop from the drawer. It was always a server. It just didn’t know it yet.